ICEINSPACE

|
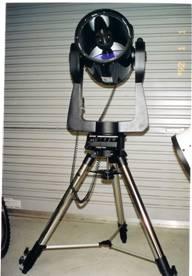
Meade 10" LX200GPS-SMT
Submitted: Monday, 21st March 2005 by Stuart Welfare
The Meade Lx200 range of Schmidt-Cassegrain telescopes was launched in 1993 and in its current form has a host of modern features that is quite remarkable. For the Australian market the LX200GPS –SMT comes standard with UTHC coatings, Smart mount, Smart drive and the LPI imager with Autosuite. Five Australian dealers currently distribute the LX200 GPS and prices fluctuate with the value of the Australian dollar against the greenback. When I purchased {29/03/04} the price was steady at $5300, twelve months earlier the cost of the scope was near the $7000 mark.
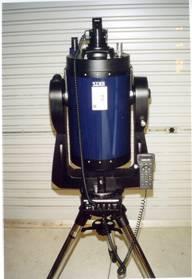
The scope when delivered comes in two packages, one that contains the field tripod that weighs roughly 20 pounds and the other that contains the OTA/fork arms /base {60 pounds} and accessories. The box that holds the OTA is very sturdy and two foam inserts with cut-outs add to the secure environment. Apart from a little scratch on the side of the base everything was in good order and all components accounted for. Inside the box is a check list from the Meade factory detailing component packing and a sticker on the underside of the telescope tube gives reference to quality checks.
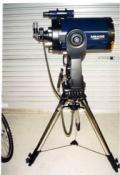
Setting up for the first time with the aid of the manual is fairly easy and straight forward. First up is folding the tripod out, I found using a wingnut/washer and tensioning the tripod very helpful before attempting to connect the OTA via the single central bolt. Doing this for the first time is a little tricky because as you hold the OTA the top of the tripod is not visible and requires a little guess work. Plus in some cases the bolt doesn’t line up with the hole and you’re forced to take one hand away from the tube to blindly jostle with the bolt. I brought a Petterson mounting assistant that’s simply a metal plate that has guide posts to line up the base over the bolt. This accessory costs around $110 and even though Im fairly comfortable now attaching the scope it just gives an element of security. Theres a cheap mod called the springy thingy that also makes this delicate procedure a little easier. After setting the OTA and tripod up attaching the finderscope, microfocuser and diagonal with the supplied allen keys is a quick process. For prospective owners who may be worried about the weight of the scope I find it manageable and no problem in altazimuth mode even though the handles on the fork arms can really dig into your hands and their location puts the OTA a little unbalanced when you carry it. In equatorial mode using a wedge things a little tougher as you have to heave the OTA up around shoulder level to connect it. With both the 8” and 10 “ LX200 the OTA assembly can be placed in between the fork arms for storage while the larger sizes can't.
Without a counterweight system the scope is very back heavy and the declination lock needs to be securely set, there is a mod to improve this function. The scope can be powered by 8 D –cell batteries that have housing points in the fork arms but the scope can quickly drain these and it’s worth it to get the car adapter power cable or the AC power cable from Meade. I have both but use the car adapter type with a 17amp/hr powertank {Projecta brand-Kmart} more often; the AC adaptor is very expensive and has no safety fuse. Before taking the scope out for the first time I would suggest getting some form of dew protection, the corrector plate up front is a dew magnet. The Meade dew shield is heavy and expensive and I went for an Orion flexible dew {$60} shield that gives decent protection even though I'm going to replace it with a better finished Astro-zap flexi type one. Power and dew protection where two issues I had on my first night out so it’s worth it to give some consideration to these two matters before the scope arrives.
Under the stars for the first time with the LX200 was a revelation and a great experience. Seated in comfortable viewing positions while witnessing this amazing GOTO technology and using the large range of slewing speed settings is quite an experience. Initial setup requires following some alignment procedures using the supplied Autostar hand controller. There's a number of options to get you going but the basic procedure involves the scope finding level, point north, acquiring GPS signals etc etc etc ….. After the scope has finished you centre 1 or 2 bright stars and the scope is set for the night. The pointing accuracy straight from the box is truly amazing, apart from user error {placing the wrong date} all GOTO commands undertaken has the object selected within the FOV of a given eyepiece. Theres training procedures that can be done to improve accuracy but I haven’t found the need to follow up although the manual recommends periodic check ups. Using the Handbox to access the Autostar database is quite simple and easy to follow and the range of functions is impressive and fun. The scopes base has a RS232 port where you can link up a PC/laptop and control the scope using a plantarium program, you can use the Autosuite program but I use the freeware program Cartes Du Ceil which works a treat. Other functions like Smart Mount, PPEC, Smart Drive I haven’t explored yet but relate more to imaging accuracy but for visual use the accuracy shown by the scope so far has been outstanding.
While all this technology is impressive the business end of the scope, the optics, is what it’s all about. Like the accuracy the collimation was spot on, fortunately first light conditions were good to undertake a star test and results appeared to be very promising. The star selected showed a symmetrical airy disk, diffraction patterns appeared identical on either side of focus and no obvious signs of optical defects. Over the following nights further tests produced similar results and overall the view visually of planets and DSO has been very pleasing. The coarse focusing knob gives some image shift while turning back and forth but it’s not a real concern and is comfortable to use for low-med magnification work. For fine tuning the microfocuser with its range of speed settings is very useful, particularly for planetary work. Even though I didn’t have collimation issues I installed Bobs Knobs to replace the factory collimation screws and these make fine tuning very easy. In altazimuth mode the standard field tripod is a very steady mount. With a simple knock to a leg vibrations dampen almost immediately and even in windy conditions it’s still very good although with a dew cap maybe adds a touch to dampening time. With a wedge it’s a bit more time to settle down but still very good.
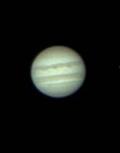
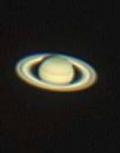
The LPI imager that comes standard with the LX200 GPS provides a good introduction to astro-photography and basic CCD imagery. The two pics of Jupiter and Saturn were taken the first night out with the new scope, although it definitely requires practice it's quite capable for anyone to produce results. The software is reasonably easy to follow although sometimes it freezes and requires rebooting.
Overall my experience with the LX200GPS has been very satisfying and I've been extremely pleased with its optical and mechanical performance and would recommend it to anyone interested. It comes with a hefty price tag but put into the context of whats out there in the market I consider it an extremely good value package that offers quality optics/aperture, technology, portability, convenience and ability to evolve into technically challenging observing and imaging. The net offers a great wealth of information on the LX200, before purchasing visit these sites to get a good idea on what the scope offers and what accessories enhance this fine instrument. Clear Skies Review by Stuart Welfare. Discuss this review at the IceInSpace Forums.  |
|
|||||||||||||||||||||||||||||||||||||||||||||||||||||||||||