ICEINSPACE

|
TMB 9" f/9 Triplet APO Folded Refractor
Submitted: Tuesday, 19th February 2008 by Dr Dietmar Hager
Design and PaintworkThe design is impressive because of its conceptual purity, simplicity and elegance! It fulfils all required aesthetic criterion - frankly speaking: it’s a real eye catcher! The tube, the CNC tube-rings and the front and rear cover-plates were manufactured stainless. The 3.5 " Starlight Feather-touch focuser and the 2 elegant silver steel handles offer maximum comfort. The lens housing is attached very securely in the front slab; the lenses can easily be adjusted if necessary. The dew shield provides sufficient length as well as a black matte surface inside. The paintwork has been carried out exactly and it is robust.
Dew shield, Tube, CNC tube-ringsDew shield and tube as well as the rear-cover slab have an absolute matte black surface inside. There are no reflections. The tube of the scope is exactly round in the crosscut and it sustains its diameter constantly on the millimeter from the front to the rear. The objective cover’s design is kept very light-weigh in plexi-glass - however, it could seal up a bit better. CNC tube rings grab the scope’s tube with ease. They consist of 2 symmetrical elements. The tube rings have velvet facing and prevent scratches. The stability is tremendous. There are 2 flat areas which are supposed to face the flange-plate of the mount and another plate on which a guides-cope can be attached. CollimationCollimating my 9" TMB f/9 "N" type folded refractor is a long story... I want to report the very essential steps and also the errors I made, that cost me quite some weeks of time. In the beginning I did not pay attention to the necessity of a precise collimation and so I just took a test image, displaying a huge gradient in the image.
So - what was the origin of this gradient? I took a look through the tube and I saw, that the collimation was way off. (sorry, no image of this status) O.k. it was clear - collimation has to be done. But how? I asked around on the web, collecting many (partially contradicting) suggestions. What I really did not like at all was the "idea" of marking the center of the flat mirrors and the lens with "black color dots"...these should help me achieving a good collimation by making use of a chesire eyepiece. Well. I was desperate to avoid touching those optics and placing anything onto the surface, compromising the coating. so I tried to find another solution. I screwed all extension tubes I could gather onto the 3,5" FT focuser and put the chesire-eyepiece in place. Then I took another look. Oh my...it was very difficult to "read" the image I saw: Eccentric figures all over the image.
I knew what it was all about: I had to make sure, that each and every single "circle"-like structure, representing the lens housing, the aperture of the front-plate, the fixation ring of the main mirror and the secondary mirror as well as the edge of the 3,5" FT and aperture in the base-plate had to be exactly concentric.
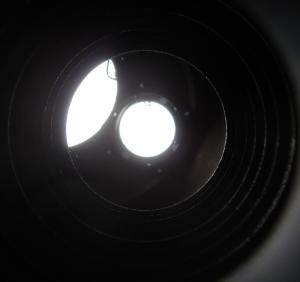
The image above is to show the "origin" of those "circles" showing up when you look into the tube: the edges of the fixation rings of the flat mirrors, the edge of the lens, the edge of the aperture of the front-plate, the aperture of the base plate, the edge of the 3,5 FT,... (the base-plate with the main mirror to the right; the front-plate with the lenses to the left) There is absolutely no chance to obtain concentricity without the most useful and essential item in collimating an optics like mine: a collimation-scope. Without a decent magnification you can never tell when the goal has been achieved, meaning - when those circles are concentric. a Cheshire eyepiece is no option. I had to learn that. You need magnification - and the Tak collimation scope provides what is asked for.
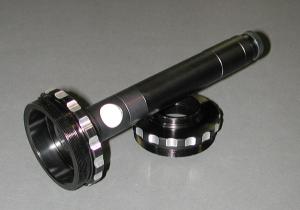
This Takahashi collimation scope was a giant leap towards the aim of finding the perfect collimation. NOW it was possible to exactly identify all those ex/concentric circles that appeared. In addition I marked the edges with tags.
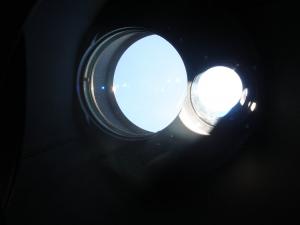
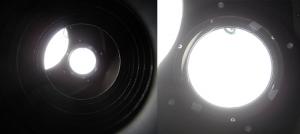
The image above is to show what it looks like when you look through a Chesire (left) and through the colli scope (right). You can clearly detect the edges of those "circles" What makes collimation with "bare eye" (or even with Chesire) even more complicated is the fact, that the interior of the tube is low-contrasted and dark (what is very good and essential for photography to have a high contrast-power) with a huge contrast-light coming through the objective.
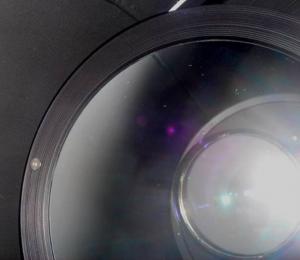
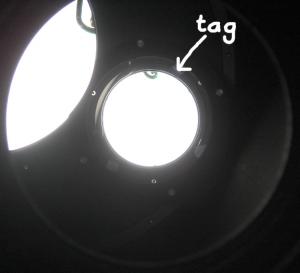
Contrast-light and TagsCan you tell me in the image above, which edge has been marked with the tag? This image was taken with my pocket-camera right through the 3,5" FT. using the colli-scope a perfect sight onto the "demanding" structures was granted. You could also see anything like dust on the mirrors surfaces. a colli-scope can be focused on each "plane" like the primary mirror, the secondary mirror, etc. this was really enormously helpful! As I got more experienced over the time I also paid attention to the fixation screws of the fixation rings of the mirrors and made sure to have them right where I wanted them in the "collimation-image". By making use of the collimations screws (3 for each mirror) it was possible to slope and level the mirrors.
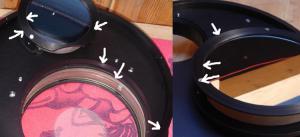
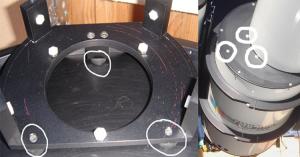
The image above shows the collimation screws from inside and outside. These are lag-screws - a "non aging" special rubber-spacer provides stability. it is essential to find the perfect pressure for fixation. Collimation has to be performed in 3 steps: first the 3,5" FT needs to sloped relative to the base plate where it is attached to until you see the edge of the fixation ring of the secondary mirror, that is located directly in front of the focuser on the front plate, until it is nicely concentric. Second step is to slope the secondary mirror that is located on the front-plate until you can see the edge of the fixation ring of the primary mirror perfectly concentric. You always have to make sure that the focus plane of the colli-scope is exactly on the right edge of the "projected circle" You need to look at...sometimes I focused on the false and wondered why I failed. Last step is to slope the primary mirror until You see the edge of the lens (and the aperture of the front-plate) exactly concentric. that’s it [-: So - here we are with a perfect collimation of the 9" TMB Apo f/9. All circles are concentric - finally.
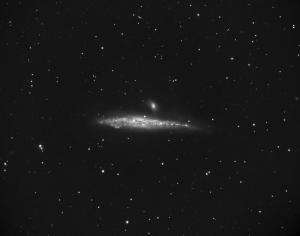
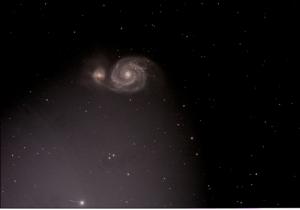
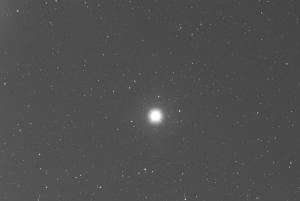
Another test image was taken now..
No gradient anymore, this is a short exposure of some seconds...but - After having collimated the system successfully, I thought I was all set for serious deep-sky imaging.
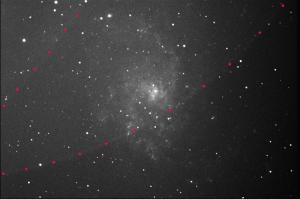
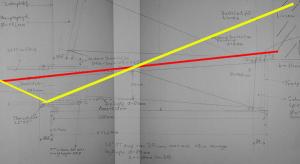
But - another problem showed up: 2 eccentric artefacts - marked with red dots. Where do these come from? Bright stars in the vicinity of the galaxy...? NO! I still had no sky-baffle in front of the focuser. Take a look
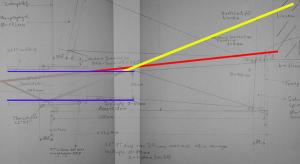
Red and yellow beams above show what has happened: Direct light coming through the lenses and missing the mirrors but falling directly into the focuser caused the artefacts. So a sky baffle had to be constructed.
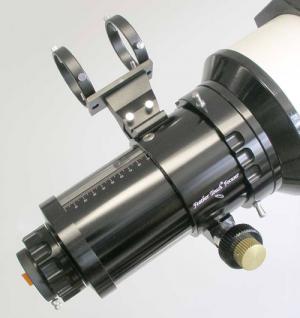
3.5" feather touch focuser of Starlight instrumentsThe focuser is so called complete feather touch design. Despite its big size in diameter it ensures smooth and precise focusing over the entire range of axial motion. By means of very handy setscrews the force can be adjusted which is necessary to move the focuser; so in every position there will be an appropriate support no matter where the focus might be (it changes depending on using a zenith-prism or if the focuser is charged with a ccd camera.) The possibility of the 360° rotation is extremely helpful particularly with regards to CCD photography. The focuser offers a millimeter scale so that the focus area can be found rather quickly by "storing" the focus points in a booklet. The interior disposes absolute black matte finish. There are no reflections. Triple APO lens and housingTMB lenses are in an adjustable housing. The reimbursement isn't overwhelming concerning reflection behaviours, though. In a 90° view directly to the lens-center reflexes happen to appear. Nevertheless this is kept in limits luckily. The optic’s quality at this considerable aperture is documented here. According to Mr. T.M.B. it is the best of all 9 " APO lens systems ever built so far. Flat mirrorLichtenknecker and Berliner glass have done excellent work. The quality is documented in this test-report, the mirrors are absolutely color neutral! Observation ReportsFirst Light - 27.3.2006In the early afternoon between clouds a swift look at the sun was granted. I used the Baader Herschel-wedge and the solar Continuum-filter and a gray scale filter for the diminution of the light. When gazing at the sun with the PO 35mm eyepiece a most wonderful view happened to appear in my eyes! Granulation in full splendour and brilliant grisp details showed up. Of course this one showed sharp granulation on clearly over the complete surface! Under 300 power still the granules were widely visible and steadily there. Unfortunately sunspots did not show up at this time. then Clouds came around. Before the night sky was completely overcast with clouds I could catch a look onto the Saturn. (Restless air with heavily changing seeing 4-6/10). I used the Baader big Bino-adapter with the 1.25 corrector changing f/9 to almost f/12) and the following eyepieces for this very first light moon observation were used: 24 mm PO, 19 mm PO as well as 11 mm Nagler: Of course this isn't a challenge for a 9" TMB APO. But already under this mild magnification rate the enormous contrast strength of the APO which I haven't encountered with any scope before in my entire life (14 "sc 16" sc 20 "Lomo Cass 14" newtonian .Strehl 0.97) impressed me a lot! So I therefore changed eyepieces quickly to gain higher power! Corresponding to a maximum magnification of 730x the 7mm Nagler and 3.5 Naglers were inserted into the Baader bino! Real good Apos are supposed to perform excellently up to 3 times of their aperture (in mm). Well: Cassini division sprang out of the eyepiece - razor blade sharp and crisp! Deep contrasts in the rings! A, B and even the faint C Ring visible!!! At the planet’s surface the central pale yellow ribbon happened to be visible and structured clearly and the two limitation ribbons as well! Given good seeing for short periods further ribbons appeared and indicated what this scope is able to perform !!! the seeing was not good enough to reveal Encke. M65, 66, NGC 3628 with the 41 mm PO one doesn't need to look for the NGC, it’s just there ! And to be more precise with it’s typical dumbbell shape at the edges! Most Impressive the contrast also! A breathtaking experience I can tell you! Usually one must have a big aperture to see these dumbbell formations of the NGC, but the 9" does this with its high contrast-power! First Light on Moon - 6.4.2006Just to get in the right mood I started with a nice overview using the 35mm PO: The structures I was particularly interested - mainly due to optimal illumination of the moon’s surface - could already be seen under enormous contrast and exactly the same razor-sharpness. This evening I used the 19 mm PO and the 11s and 7s Nagler: Rima Hadley at 360 cracking sharp and with the interruptions and creases as well as the enclosed small craterlets! Rupes recta with the marvellously rugged surface at the high plateau which is strewn over with smallest craterlets. The well known 5 small craters which are ordered nearly in a pentagram were super extreme mega sharp visible! Rima Birt with the interruption anyway - really no match for this scope. Vallis alpes this experience was really groovy! Never before in my entire life (I was used working with 14 "sc, 16" sc, and 20" Cass of Lomo for more than 20 years) I did see the central groove of that very valley. But this was ended that night: the central rima was not only foreseen but it was just there!!! Jumping right out of the eyepiece, an extremely overwhelming sight!!! Most rich in contrast sharp and crisp into the corners! Jupiter: 30° high one saw the moons as differently large and differently bright clear and sharp edged discs and this despite of the very undulating atmosphere ! The details at the planet’s surface reached from the white small ovals to structures in the GRS up to the marvellous blue sprays in equatorial area. All this with the Baader big Bino viewer including the 1.25 corrector. First Light Photography - 4.7.2006Getting an accurate focus the ccd camera already attached with the Feather-touch is a wonderful simple and easy exercise for some seconds!! The focus comes promptly and within a ultra short range. Thinking of the pastime ... with the sc scopes - finding the focus was a challenging nightmare! Although moon was high up in the sky and the transparency was extremely rotten, it was sufficient for some test photos. Unfortunately, seeing was bad 3-4/10; Transp 2-3/10, bad contrast (fine dust?). Binary Stars..."point fourty-niner" - 13.6.2006I used the Baader big bino including 1,25 gwc with the 5mm Burgess eyepieces (512 power). Seeing was around 4-5/10; for some glimpses even a bit better. The optics capability to split binary stars is approximately 0.53". I wanted to find the limit in star-split-performance of my 9" TMB APO. Some guys were very - let’s say curious - and concerned about the folded design with 2 more possible sources of optical aberration (the 2 flat mirrors inside the tube) - but I can tell you this: "don’t worry folks - it’s perfect!" Here is the list of binary stars I had chosen to be my test-objects.
Luckily seeing improved right now - up to 6/10.
Obviously it makes the very difference to find 85% of the starlight within the center instead of 48% like in Schmitt Cass systems. the contrast is essential even in binary star observation. I’m really happy with my 9er ! 22.7.2006
So this is my test-report for the TMB Apo 9"f/9. I can honestly subscribe each and every written line with my heart blood and although the scope is really expensive it is worth every single Euro. Images that have been taken with this telescope can be found on my website. Resources and Links
Review by Dr Dietmar Hager (Dietmar). Discuss this Review on the IceInSpace Forum.  |
|


![image027_[800x600].jpg](content/images/194b140f9e6d03f36db4e0ab785d8f7d.jpg)
![image029_[800x600].jpg](content/images/5bd57451fc7623e467be402d3f5ec236.jpg)