ICEINSPACE

|
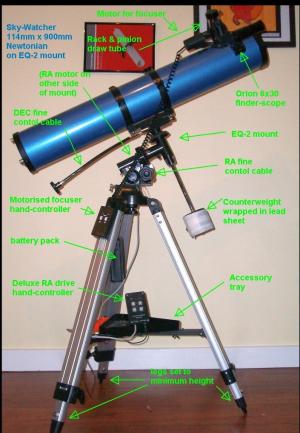
SkyWatcher 114mm (4.5) by 900mm Newtonian on EQ2 mount
Submitted: Tuesday, 12th January 2010 by Colin Hut
Why?So you wonder why? I already had a 4.5” Bushnell Northstar on an alt/az “GOTO” mount. It was an experience I was unlikely to forget. I also had a 10” GSO Dob. So what could drive a man to this? Well I wanted a cheap EQ-mounted telescope in order to learn how to use an EQ mount. After a lot of hunting around, it transpired that it was far cheaper to buy a complete telescope including an EQ mount than it was to get either an EQ-2 or EQ-3 mount separately (although the EQ-3 would have been substantially more capable). I also wanted the EQ mount to have a right ascension (RA) motor drive. Ultimately, in September 2008, I bought a Sky-Watcher 114mm (4.5”) by 900mm Newtonian with EQ-2 mount and “deluxe” single-axis motor drive with hand-controller for AUD 229 including free delivery from Andrews. I live in Perth so I couldn’t do much better. PackagingIt came in one big box, well packaged, a mere week after ordering it. AssemblyIt took about an hour to assemble going at a very slow pace. All tools necessary were provided and assembly was straight forward. The instructions were adequate although they covered several different models. I had already downloaded instructions from several websites for the same model differently-branded in order to compare instructions. There were only a couple of significant differences, and these related to the use of the setting circles and hand-controller. The mount is rated to about 10lbs, and I would guess that the long (albeit lightweight) OTA and accessories comes close to that mark. The primary mirror I believe to be spherical. Collimation was fine although I use a Cheshire combination sight tool and the Barlowed laser method to check it occasionally. This is reasonably straight forward with practice. For some reason I expected the telescope to come with a spider rather than a stalk for the secondary mirror (that is what was shown on the Sky-Watcher website) but mine was an older ‘blue’ series with stalk. The Optical Tube assembly (OTA) itself is exactly the same type as in the Bushnell Northstar, Celestron, Orion and other equivalent types (which is hardly surprising as TASCO own Bushnell, Celestron etc) The order of assembly was (roughly):
Fitting the motor drive was simple, (although the use of the buttons on the hand-controller was not). You have the option of removing the RA fine control cable or leaving it in place when fitting the RA drive. If you take it off you always have to make fine adjustments with the hand-controller. If you leave it on, with the drive disengaged you can use the fine control cable which is often quicker and saves on battery-life. I left it on although sometimes it can get in the way of the OTA. The RA drive is engaged by means of a lever attached to an eccentric cam which moves the whole motor and thus the spur gear into contact with the large RA gear wheel on the mount. It is held in place by a spring. The spring has insufficient tension and so even after balancing the telescope it would sometimes skip teeth. I hang the battery pack for the motor drive on to the Latitude adjustment screw out of the way. BatteriesI am still using the original batteries that I bought - a set of four alkaline D cells rated at 12-20 Amp-hours). EyepiecesI think it came with a 25mm and 10mm plössl as well as a x2 Barlow (although I am not entirely sure as I gave them away). They had nylon barrels and had a few internal reflection issues but were otherwise clear and quite useable. Finder-scopeThe telescope came with a plastic 5x24 stopped down finder-scope. Reflections were awful and the stopping down cause further problems. It was barely useable and entirely inadequate. It was however very light which is important for balance. Telescope balance“As is” with the plastic finder-scope, and with the plastic-barrelled eyepieces in it, balance was achieved with the counterweight 90% of the way down the counterweight shaft. Not much room for manoeuvre there! PortabilityThe whole lot can be carried easily short distances by placing both hands under the mount and lifting it vertically. I store it set up and carry it out the back door in one piece. In useAfter setting the EQ-2 mount for the correct latitude, I level the mount at its lowest position (for stability) with the aid of a small spirit-level placed along the top of the mount-base in three places (I have a small orange level with magnetic tabs and store it on the side of the accessory tray). I align the EQ mount with True South by eye with the aid of a compass allowing for magnetic deviation. (My whole southern quadrant is blocked by trees). It takes all of a couple minutes. The alignment is usually sufficiently accurate for visual use to keep an object in view with the motor drive on for 10-20 minutes. Often too, only correction is needed in declination. The telescope rotates freely by using the RA and DEC locknuts, which are reasonably handy and large enough. Only minimal tightening of the lock nuts is required to hold the telescope in place. The fine control cables work well even at high magnification, although you always seem to be standing on the other side of the telescope from the RA cable, especially when pointing North. The EQ mount does take some getting used too, but having a planisphere which mimics the use of an EQ mount helps considerably. Using a Newtonian on an EQ mount often results in the eyepiece being quite high up – another reason to set the legs of the mount on their lowest setting. I recommend an observing chair to anyone. I made one based on plans for a “Denver” observing chair from the Web which certainly improved my comfort level. The rack & pinion focuser was poor, hard to focus properly as the eyepiece moved around too much in directions other than in and out, due to excessive slop, and when tightened up caused the whole tube to move slightly when using the single ratio focus knob. This might not be as noticeable on a heavy telescope, but on a light-weight reflector the torque induced by moving the rack & pinion knob causes substantial movement to the OTA. The RA drive works quite well (noting the teeth-skipping issue cited above). However, the instructions on the motor-drive hand-controller were a bit confusing. Notwithstanding that this is a Sky-Watcher telescope, the instructions on the use of the hand controller did not match actual usage. The instructions provided state that:
This is not correct, as per the Orion instructions :
Likewise the description of the other buttons is somewhat misleading and does not match the labelling of those buttons:
The correct instructions are given in the Orion manual
Indeed the top buttons are labelled “x4” on my EQ-2 controller. The green power-on LED on the hand-controller which changes to red in use is too bright, and I tend to put my finger on it before using the controller. The accessory tray provides a modicum of on-site storage and also acts as a spreader and stiffener for the legs and works fine. I almost never use the mount with the legs fully extended – in fact only once and that was to get a clear view at Mercury over a fence a 10 degrees elevation. Down low where it usually sits, vibrations dampen out on the lawn in a few seconds. This is better than I expected. Given a focal length of 900m the telescope’s maximum TFOV is about 1.7 degrees with a 1.25” eyepiece. It is not fitted with a 2” drawtube. I find that it worked well with my 32mm TV, 25mm GSO and 9.7mm Meade plössls. I also use a 16mm UWA 80 degree which is also just fine. For use on Jupiter and Saturn I can Barlow the 9.7mm or I also have a TMB 5mm planetary which is about as powerful as you can use. With the motor drive on, seeing permitting, high magnification is quite possible with steady images and enjoyable views. The declination fine control cable permits only 25 degrees of movement (a “feature” of the EQ 1 and 2 mounts) so every now an then you will need to slacken off the declination lock nut and wind back the fine control to about half way again – relock the drive and make fine adjustments. Sometime you get lucky and do no need to adjust it for a long time. For some reason this “feature” is not mentioned in the Sky-Watcher manual, but is clearly spelled out in the generally superior Orion manual. At some angles you need to rotate the OTA in its tube rings to see anything although this is not a hard thing to do. It can slightly change the telescope’s alignment. Sometimes (and more irritatingly) the OTA can collide with the fine control cables and so you need to rotates the telescope to the other side of the mount. The Setting Circles
Now wherever they make these telescope mounts (doubtless a big factory in the PRC) they must make a lot of these OTAs but with minor changes at the end of the line to suit the particular brands under which they are sold. As a consequence, this mount comes not only with scales for both the Northern and Southern hemispheres, but also two sets of RA pointers for the RA setting circles. One set of pointers is for the “Sky-Watcher” way of using the setting circles, the other is for the “Orion” way of using the setting circles. The Sky-Watcher way requires you use the RA marker on the West side of the mount (the one marked Sky-Watcher RA pointer). The calibration instructions state that:
Then in theory you can hop to another place by simply rotating the scope to the stellar co-ordinates, and with luck it might be in your finder-scope. The Sky-Watcher instructions are, however incomplete, and will not work without a crucial piece of information regardless of whichever RA pointer you use. The missing information is included in the Orion manual. With the "Orion" method you use the white painted marker on the top of the RA drive housing directly under the RA scale. (This is only used in the Sky-Watcher manual for assisting in roughly lining up the axis of the mount with Polaris).
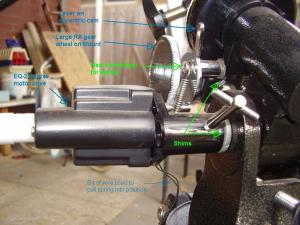
The setting circles are anchored to the RA shaft by the lock nut and so will stay on track during the observing session whilever you allow the mount to rotate at sidereal rate. Without the use of the thumbscrew, you cannot calibrate the setting circles. I think that the RA scale would be easier to read if it were placed on the back of the mount like on the GSO SV-1 mount. ModificationsAs noted, it needed a new finder but it really is not worth the cost on a value-for-money basis. Nevertheless I added an Orion 6x30 correct-image right-angle finder-scope with new dovetail base and screws, intending that I would keep it if ever I get rid of the OTA. This also required wrapping some lead sheet around the counterweight and sliding it to the end of the counterweight bar in order to keep the telescope balanced. As the rack & pinion focuser was so poor I decided to replace it almost straight away with one I had previously fitted with an electric focuser on my Bushnell Northstar as the OTAs are almost identical, I just swapped over the lower assemblies of the rack and pinion focuser complete and tightened the adjustment screws. This works well as the focus motor is attached directly to the base of the rack & pinion focuser and thus the OTA does not move when changing focus. Tolerances were not adequate on the Motor drive pivot-shaft and the lever-shaft. I ended up shimming them both a couple of mm and also attached the spring on a more acute angle to increase its efficiency. As originally set up the spring exerts most of its force sideways rather than vertically. This modification fixed the problem of the occasional ‘skipping teeth’. (I also used some fine wires to pull the spring into place and I have not removed them.)
What would it benefit from right out of the box?A much better finder-scope than the 5x24 it came with would make a big difference to the viewing experience. A simple 6x30 straight through finder or a good quality unit finder should come as standard. In addition, more balance weights or a longer (and stiffer) counterweight shaft would assist in balancing. I might get a small barbell weight one day. Pros and ConsPros
Cons
AstrophotographyI have used the scope for imaging Saturn and the Moon with a modified web-cam. It is clearly capable of relatively short exposure imaging of the solar system. Certainly I have taken a number of 30 second AVIs and I could easily have taken a couple of minutes with negligible drift at moderate power. I doubt I would try any kind of DSO work. OverallI think that for the price, – these represent outstanding value for money so long as you know what you are getting. (I think that some suppliers here in Australia however do charge more than twice the “best” price for these scopes and this does not represent good value for money. It does not give as bright a view of the planets or show as much detail in M42 as my 10” Dob, but it does show good views of many objects, and it is a lot more portable and cheaper. At the time of writing, the basic model is available from about $200 and upwards. If you want motor drives and decent finder, add another $150-200 approximately. A cheap motorised focuser about $70-80.
Review by Colin Hut (ColHut). Discuss this Review on the IceInSpace Forum.
 |
|