ICEINSPACE

|
Making a White Light Solar Filter
Submitted: Wednesday, 29th June 2005 by Mike Salway
I've wanted a solar filter for a while, to be able to view sunspots and use my telescope gear during the day, and when the nights are cloudy! Ideally I would've liked a Hydrogen-alpha filter or a PST, but the budget simply doesn't extend that far right now. So my only option was a white-light solar filter, but the next decision was whether to get a glass one, or get some solar film and make a filter myself. In the end it came down to cost.. A glass solar filter for a 10" newt costs AU$230 or more, and the solar film for the same size is 1/5th of the cost. The Solar Film
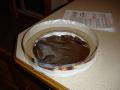
I order a 30x30 cm square of baader astrosolar film from Telescopes & Astronomy in South Australia. It costs $45 + $10 for postage, and arrived in about a week. The film came rolled in a tube postpack and looks a lot like aluminium foil, but is much floppier. The Solar Filter Cell
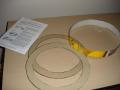
To make the solar filter cell, I simply followed the nicely detailed instructions that can be found here on the astrophysics site. I found some old carboard and made the strips for the supporting sleeve, and then cut out the circles for bits that hold the film. It was really easy and only took 20-30 minutes. The sleeve was a bit floppy because it was made out of several pieces thin cardboard taped together to make it thicker, but I hoped that when the top was stuck on it would give it strength. Putting it All Together
Again, simply following the instructions from the astrophysics site, I laid the film down on the bench and put bits of double-sided tape around the cardboard rings. Apparently it's important not to stretch the film, so I let it remain loose enough while still being tight enough, if you know what I mean :) There was still some wrinkles and I made sure it wouldn't get damaged by stretching. Once I'd done this to both sides, I trimmed the excess solar film from around the edges and took all the material outside to the scope. I put the sleeve on first, and then rested the cell holding the film ontop, and taped it together at 8 points around the circle. Once it was held in place, I lifted the entire thing off and then fully taped along the edge of the sleeve where it meets the cell. I used strong duc-tape to ensure it wouldn't ever come off. First light!
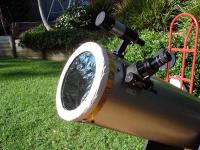
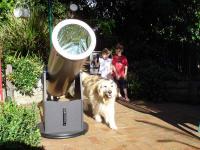
The solar filter fits snuggly over the top of the OTA, it'll never fall off on its own as I have to slide and wriggle it to get it off. That suits me just fine, so there's no chance of it accidently falling off or being pulled off and making someone go blind! The filter got its first light on Wednesday morning 8th December 2004. The view was as expected, a white disc of the sun with darker sunspots. Unfortunately on this occassion there was only 1 small sunspot to be seen near the right limb (i'll get the directions right one day :)). The wife and kids had a look too, I think they enjoyed the view. I mean, it's no PST but it will come in handy for active sunspot regions and future Venus transits! :)  |
|
|||||||||||||||||||||||||||||||||||||||||