ICEINSPACE

|
Installing a Moonlite CR2 Focuser
Submitted: Wednesday, 29th June 2005 by Mike Salway
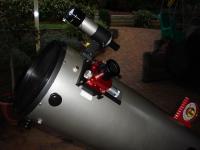
Like most newtonians, my 10" dob came with a standard rack and pinion focuser. It wasn't horrible quality, at least it wasn't plastic, and it did come with compression rings to hold the eyepieces in place. However it had its drawbacks too.. There were 2 adjustment screws on the front of the focuser, and when loosened, allowed smoother free barrel movement up and down. But this came at a cost - slop in the holder. So you could tighten up the screws so there was no slop, but then turning the knobs was tighter and at high magnifications, it wobbled the scope about and was a real pain both visually and especially when imaging. The solution? A premium focuser! And they don't get much better than the Moonlite range of focusers. I bought a second hand Moonlite CR2 dual-rate focuser from forum member Vermin (thanks Tom). The dual-rate means it has a course-adjustment knob (on the left) allowing fast up and down movement of the barrel, and it has a fine focus knob (1:8 ratio) on the right side for the small increments and accurate control needed to get that snap focus.
The focuser didn't come with curved mounting plate or any spacers, because Vermin didn't need them for his installation. I had to buy an install kit from Dale at DBA Astronomy in the US which included the above, plus an excellent set of installation instructions. Dale was most pleasant and helpful to deal with and I definitely recommend him! The installation instructions are much more in-depth than what i'll write here, but the first step is to get comfortable. Make sure your OTA is secured (drilling is required!). I used the foam inserts that came from my original packaging.. I also did it all inside because the tennis was on! :)
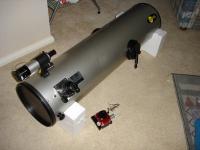
Removing the old focuser was simple, as easy as unscrewing the 4 screws from inside the tube. I didn't even need a spanner! It's worth noting here, that you should ensure that your secondary mirror is covered and protected. Take it out if you feel the need, or as I did, just cover it with bubble wrap. You don't want any screws dropping on teh mirror, and you don't want dust and metal shavings dropping on it either.
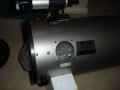
The instructions from DBA also included a nice template for where to drill the new holes. Just make sure the template is centered over the large hole, drill a pilot hole in each of the four screw locations, and then drill the final size holes. Again, just make sure you and your OTA are comfortable, make sure it won't slide around with the pressure you need to put on to drill the hole, and be careful when the drill punches through as it has a tendency to grab the metal and try and spin it around :)
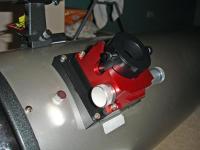
Once the holes are drilled, it's a simple case of fitting the new focuser and tightening the screws (don't overtighten!). Some will claim that the focuser must be square to the OTA, but I didn't bother with this as this myths page seems to debunk that theory, and I haven't had any problems with collimation or star tests. Of course after all this work, the scope needs to be recollimated, the secondary will probably be out quite a bit. At the same time as purchasing the install kit, I got a Cheshire Collimation Tool which made that job easier too. After first light, I can say that the focuser is great! The fine focus knob really allows for accurate control when near focus, allowing you to make the micro adjustments necessary to get the crisp sharp focus needed to enjoy visual observing and especially for webcam imaging. I'm really happy with my focuser upgrade and although the Moonlite focusers aren't cheap, they really are worth it if you're unhappy with your current focuser.  |
|
|||||||||||||||||||||||||||||||||||||||||