ICEINSPACE

|
Home Made Observing Table
Submitted: Wednesday, 13th April 2005 by Ian Ogilvie
I decided to build this observing box/table several years ago after getting tired of dew soaked charts on a dew coated card table and tripping over, or not being able to find the eyepiece box. This is not an original idea. I happened across a description and photo of an observing table in Dave Gaults web site; http://www4.tpgi.com.au/users/daveg/. I thought his design looked really practical and with some modification would suit my purposes. I took note of Daves comments on his design and adapted the design for my requirements. I had never attempted to build an item like this before so I was not totally confident of the outcome. When I commenced planning this project I listed the following requirements for the observing box:
My general concept was that I would have to remember to pick up only 5 items to pack the car for a deep sky night; telescope tube, telescope base, card table, observing box and chair. The observing box was fun to build and has worked well. However I still seem to have to pack the car with 20+ items each time I travel to a deep sky night.
Description
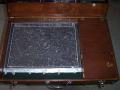
The overall dimensions were determined by the size and orientation of the star atlas I was using at the time; Sky Atlas 2000.0 field edition and the eyepiece and tool stowage requirements. I calculated these dimensions would allow me so fit a small reference library into the lid with room to spare. The closed dimensions of the observing box are:
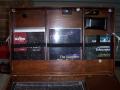
DesignThe observing box is quite simply a ply wood box with a hinged lid. The base and the lid have identical external dimensions and the lid stays hold the lid open at an angle so the lid overhangs the base and provide some dew and wind protection. Hardware used for this project:
The observing box was fabricated out of 6mm plywood for the top, bottom and compartment lids, and 10mm dressed pine for the sides and internal compartments. I also used 3mm plywood for the small raised step around the top of the base for the lid to close onto. I am sure this feature has a name in the cabinet making world. I selected these materials as I already had them on hand and appeared to be of suitable dimensions for the task.
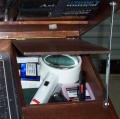
I first constructed the base and lid as identical units and then added the small raised step into the base and the main hinge. Next step was library compartments in the lid. It was at this point I realised I could probably use a bumper on the RH library compartment to keep the rear equipment compartment lid closed. The photo to the right shows the bumper above the opened rear equipment compartment lid. When the observing box is closed this bumper pushes lightly against the lid and keeps it closed.
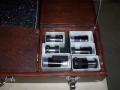
The box was designed to hold the following items of equipment: Base:
Lid:
In the field it works just as intended. The open lid keep the dew of the charts, all the equipment is on hand and due to the dim red LEDs you can find what you want without fumbling for a torch. You do however have to use additional red light in order to read charts. Modifications
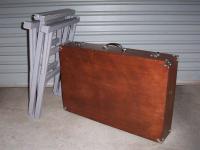
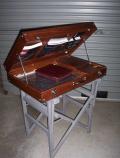
In use the unit was placed on top of a card table as intended. However I subsequently modified a wooden folding chair frame to provide a more compact and stable set of legs. At this point, as it was no longer a box sitting on a table, it became an observing table in its own right. As I have acquired more equipment there has been a tendency to fit more items into the box with the resultant weight increase. After I finally noticed this middle aged spread I acquired a canvas tool bag and banished some items from the observing table as listed below.
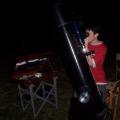
In The Field
The observing table has been great to use in the field. I find I dont use the library every time, but it is nice to have the books there when you need them. I consider the table size/weight to be on the upper limit for easy stowage in, and removal from, a medium sized station wagon. Due to weight issues one needs to watch for any tendency to add additional bits and pieces. The dew and wind protection provided by the angled lid has worked just fine. I have also found the red lights have greatly simplified changing eyepieces, adding filters etc. I have noticed as the evening progresses and different eyepieces are used, I tend to just leave them loose in the chart area. This is probably an indication that the eyepiece compartment, while working really well for stowage and transport functions needs rethinking. I suspect it also indicates a tendency towards laziness on my part. Initially I placed the observing table on top of a card table for use in the field. I found it a real pain to carry both the card table and observing table in the car. Fortuitously the cloth seat on one of our folding chairs gave way and this was an opportunity to make a set of folding legs for the observing table that would take up less room and be more stable than the card table. The absence of the unused area of the card table does however lead one into an unfortunate tendency to leave partly consumed cups of coffee in the chart area of the observing table, with the obvious results. SummaryLiked
Not Liked
Knowing what I know now, would I make the same decision again? Yes I would (and I will) build another observing table. However, I will change the design by simplifying the stowage requirements to allow for more room for chart use and incorporate folding legs into the design. I will also change the dimensions to accommodate either SA2000 or HB Astro Atlas. It also needs a fold out cup holder incorporated into the design. Overall & AcknowledgementThis observing table has worked well for several years and regular use has given me inspiration for an improved design. I must thank Dave Gault for publishing the details of his observing table on the web, thereby providing me with the inspiration to build a similar unit. Contributed by Ian Ogilvie (stringscope). Discuss this article at the IceInSpace Forums.  |
|
|||||||||||||||||||||||||||||||||||||||||||||||||||||||||