ICEINSPACE

|
High Dynamic Range Processing using Photoshop CS2
Submitted: Thursday, 4th May 2006 by Doug
Photoshop's HDR option offers the Astro-imager an opportunity to flex his/her creative muscle in new ways. Unfortunately Adobe have not provided a lot of guidance for those wishing to experiment with Astro-images having a high dynamic range. It is for this reason that I wish to share what little experience and knowledge I have with others who also enjoy the hobby of Astro-imaging. HDR processing should be understood right from the start as being a form of Layer processing. What happens with HDR is that three or more images are merged into one final background layer, but unlike conventional layered images, HDR provides us with a 32bit depth image. Early attempts at using HDR with a set of images of known exposure produced mixed, and somewhat confusing results, for no other reason than that Adobe seem to have interpreted EV (exposure value) somewhat differently from the common convention. Normally EVs rank in line with image density, such the most dense image will have the lowest EV for that set of images. By way of example, a set of four images might have a conventionally calculated range of EVs from -6 to 0, where -6 represents the most dense image and 0 represents the lightest exposure. However with Photoshop we need to do a few things to our numbers in order to get a positive and consistent error free result because EV in Photoshop is not quite the same thing as EV in conventional photography. I need to say at some point that the use of shutter speed, f/stop and ISO in HDR seems to have no useful application to Astro-imaging. Photoshop it seems, requires the following guidelines to be observed. First thing to remember is that Photoshop reverses the order of rank, so that in our example image set above we need to assign the most negative EV to the least dense image and the most positive EV to the most dense image. This will avoid an error message which confusingly tells us; "There is not enough dynamic range in these photos to construct a useful HDR image". There are a few other things we must do if we want to avoid Photoshop confusing our attempts at processing with this tool. The rules for HDR that I have observed can be summarized as follows.
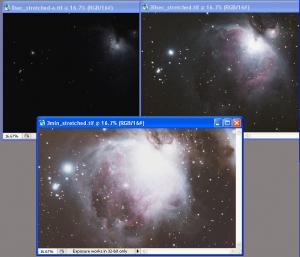
An Example of HDR ProcessingThe three Images of M42 below, are the copyright property of Tony Hitchcock and are being used with permission.
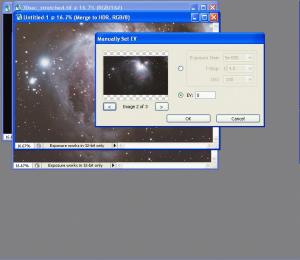
The HDR Processing tool is located in the 'Files' menu and is revealed by first selecting 'Automate', and then selecting 'Merge to HDR'. The Images can then be selected from either files or folder, or open images. I have chosen the latter.
After selecting your set of images a new screen appears with a 'Manually Set EV' window. I have used an EV of -10 for the 8sec image, 0 EV for the 30sec image and +7 for the 3min image. This has set up a dynamic range of 17 for this project.
Having assigned an EV to each, a new screen will appear which has a set of thumbnails on the left, with each image showing the EV and a small check box with a green tick. These correspond to the layers palette in normal Photoshop operation, with the check boxes acting similarly to the little eyeballs to the left of the layers palette. These might be used in conjunction with the histogram display and tentative image to asses the likely contribution of each image to the overall result. By unchecking the box for an image, its contribution to the overall image can be studied. It is at this time that a decision to go back and reassign EVs would be made if it looks like the end result will be unacceptable. The histogram has a single slider which can be used during the evaluation process but has no effect on the final 32bit image. The last areas of this screen to mention are firstly a little selection box towards top right which has three 'bit depth' options; 8bit, 16bit or 32bit. It is here and now that a choice should be made about what we want to finish up with. Most imagers will want a 16bit file to continue processing with after the 32 bit depth work is done, so now would be the ideal time to nominate 16bit. The Image will still remain 32bit until the final HDR process is executed, it just saves some time to select bit depth now. The last area is the OK/Cancel options. After clicking ok, the images will be merged into a 32 bit image ready for some further processing.
On the histogram window (which always accompanies a 32bit, 16bit or 8 bit conversion) selecting 'local adaptation' will allow maximum control over your image in 32 bit mode. Apart from a curves type tool, this window also provides a filter with properties similar to unsharp masking and a highly useful 'corner' check box. In the display above, I have checked the corner box to illustrate the effect it has on an otherwise normal looking curve. I have also increased the radius from 16 to 40, and raised the threshold from 0.5 to 1.0. The above image shows a similar result to the image on the home page. The down side of HDR seems to be an increase in S/N especially towards the extremities of nebulosity. I hope that this article has been of some value to you, and I also hope that if anyone has any further information on the use of HDR, they might forward it to me, Doug.
Article by Doug. Discuss this article on the IceInSpace Forums.  |
|