ICEINSPACE

|
A High Pass Layer Approach to Image Enhancement
Submitted: Tuesday, 4th July 2006 by Doug
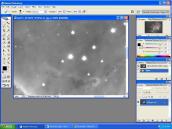
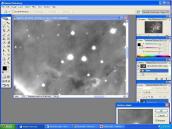
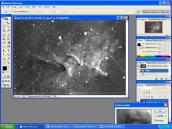
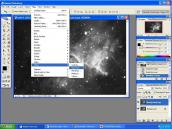
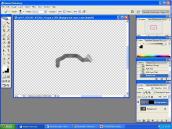
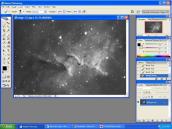
IntroductionMany a good image can benefit from some form of filter enhancement, and in this article I offer a very gentle yet powerful method which uses Photoshop’s High Pass Filter Layer Mask tool to preserve the integrity of stellar images while highlighting nebula and or dust lane detail. Everybody has their own preferences and ideas of what a ‘good’ image will look like, however I would like to suggest that an image with stars looking stark and unnatural is to be avoided at all cost. Stars that look like pieces of confetti on a speckled dark background look garish and unnatural. Stars with dark rings around them invariably suffer from over sharpening by any of several methods a few of which I will show. These dark haloes accompany JPEG images mostly, but sometimes JPEG is what we have to work with, and if the dark rings are not there in the first place it seems to me to be a good idea to avoid introducing them. In this article I have chosen to use an image supplied by Jim Misty, it is a Hydrogen Alpha image of a Nebula region known as Melotte_15, however the techniques that I use will work just as effectively with RGB images. The Image I am using in its native fit format is 20.4M in size, even a jpeg conversion is over 5meg, therefore I will make no attempt to try to post it within the 150kbyte constraint of the forum, instead I will use screen shots only. Image 1 is the basic Ha image with some stretching to show the nebulosity, but with no filtering. It has been converted to JPEG for the sake of demonstration, and the main image widow is at 100% to clearly show the absence of any haloes, (JPEG induced or otherwise) around the stars. Image 2 is the same image with unsharp masking applied. Notice how the star images actually increase their size under unsharp masking, and this will happen no matter what file format is in use. The image would now need deconvolution to reduce the star image sizes which will further mess the image up. Notice also how stark the stars have become. Image 2a shows a reduced scale, side by side display for easy comparison of star image sizes, with the active image window being unsharp masked image.
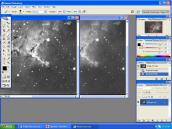
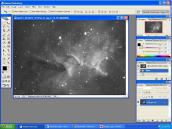
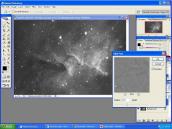
Image 3 is the basic image shown whole, and image 4, again demonstrates the effect of the unsharp masking over the whole image. The stars in image 3 are not too bad, though they could benefit from some shaping; A better approach to highlight the features of the nebula without wrecking the star images could be to use a High Pass Layer mask.
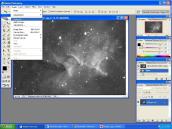
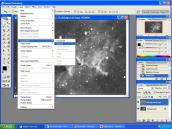
The ProcedureThe first thing that I would recommend is to duplicate the basic image, though not strictly necessary, it is the safe thing to do. The duplicate image could be named anything useful; I will use whatever PS offers. See Image 5. Next thing is to make a duplicate layer, again I will use the name PS offers. Note that in Image 6, the active image window is now a copy, or simply a duplicate image, just prior to making the duplicate of the background layer. Next, having made a duplicate background layer we need to change the blending to ‘overlay’. The image appearance changes dramatically but this is only a temporary change. The blending change is made by selecting it from the menu window on the layer palette. See Image 7.
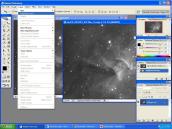
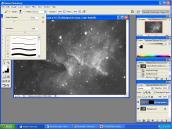
The next step in the process is to select the high pass filter tool. This is done by selecting first ‘Filter’ then ‘other’ then ‘High Pass’. See Image 8. I usually use a radius of about 8 to 10 pixels for this process because I believe in a gentle approach. The procedure can be repeated several times increasing the effect with each iteration. This is better than using a more aggressive filter radius and risking a ruined image. Image 9 shows the effect of this high pass filter on the image, and notice that the star images have been reduced, leaving a dark halo around them. This is where the layer mask comes to the rescue. To save time and reduce the number of images needed for this article, I have used a radius of 80 pixels (very aggressive) for this next phase, but in a real life processing run, I would typically use a radius of 8 pixels. The next part of the process is the creating of a ‘layer mask’ set to ‘hide all’. See Image 10. The active window now has the appearance of the original image.
Next step, see Image 11, is to select the ‘brush tool’ from the tools palette, and be sure that the background colour selection is set as shown within the red circle; if it is not, then click on the reset button lower left within the red circle, and or the arrows in the top right of the red circle. The brush tool will need to be adjusted to a value that allows a reasonable coverage yet allows stars to be avoided. We don’t want to paint over stars; that is why we produce the layer mask. Image 11 shows the selection of the paint tool, and Image 12 shows the selection of the brush size. Note that in this example, the image is at 16.7 % and 50 pixels would normally be way to big. A more usual size might be from 8 to 20 pixels or so. The size of the brush can be seen as a small circle near center image.
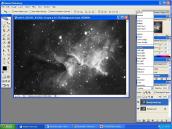
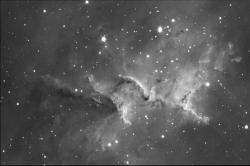
Next thing to do is to start applying the layer mask to the image by holding down the left mouse button while drawing the mouse over the image where sharpening is to occur. A useful thing here will be to zoom in on the image. Image 13 shows the sharpening process begun. Notice that there is no dark ring around the stars in this image, yet the nebula detail is being enhanced. Image 14 shows what is taking place on the layer mask. Image 15 shows the final image after the filter has been applied to the required areas and the image layers have been merged.
The final image is shown below and there is still no evidence of dark rings around the star images, which are fairly tight, yet not stark and confetti like. I mentioned earlier that a gentle approach is desirable with possibly multiple iterations; it is after the merging down operation that a second and subsequent iterations would be commenced. (Duplicate layer, change blend mode etc. etc.) I hope this article will be of some benefit.
 |
|
||||||||||||||||||||||||||||||||||||||||||||||||||||||||||||||||||||||||||||||||||||||||||||