ICEINSPACE

|
Basics of Drift Alignment / Polar Alignment
Submitted: Friday, 15th June 2007 by Geoff Smith
Polar alignment is essentially a simple process that shouldn’t scare anyone. The aim is to get the polar axis of your mount parallel to the Earth’s axis. This is done in a two step process:
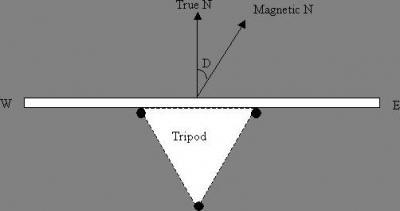
Rough AlignmentYou need a compass and maybe some leveling tools, depending on the nature of your mount. Some have levels built-in, others don’t. So start by leveling your mount. This is not actually necessary, but it does make things a bit easier, as will be explained below. Don’t fuss overmuch here. Near enough is good enough. You need to make two adjustments when polar aligning. First, the polar axis has to point N-S (the azimuth adjustment). Secondly, since we are hanging off the side of the Earth, the celestial pole is about 33 degrees above the horizon in Sydney, so we have to make an altitude adjustment. The altitude of the celestial pole is always equal to your latitude. Rough altitude adjustmentMost mounts have some sort of latitude scale. Set the adjustment to be equal to your latitude and you are done. Rough azimuth adjustmentWith a tripod, probably the easiest way to set it up is to orient a long piece of wood in the E-W direction. You put two legs of the tripod against these, so that the third leg points S. To do this you need
I’ll say a few words about magnetic declination. At the time of writing, this is +12.558 degrees for Sydney, so it has a positive sign. This means that the compass needle points 12.558 degrees E of true N. If the value for your location has a negative sign, then the compass needle points W of true N. There are too many compass designs to go into detail here, but the setup you are aiming for looks like this (with the magnetic declination D=12.558 for Sydney):
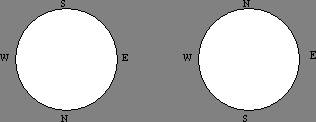
If you don’t use a tripod, for example if you use a pier, then you have to be a little more inventive, but the idea is still to establish true N and point the polar axis in this direction. Once again, don’t spend too much time here. Getting within a couple of degrees is probably good enough. There should be enough adjustment in the mount to take care of any minor inaccuracies. Once you are roughly polar aligned, it is time to fine-tune your setup. Fine tuning by drift alignmentIn order to drift align, you need an eyepiece with cross hairs and an equatorially mounted telescope. Altazimuth mounts, driven or not, don’t qualify for drift alignment. The purpose of drift alignment is to get the polar axis of your mount parallel to the Earth’s axis. Step 1: Identify the directions in your eyepieceFirst identify the directions in your eyepiece. Start with the West (or Preceding) direction. This is the way the star drifts in RA when you are not running the motor. Directly opposite to this is the East (or Following) direction. Alternatively, you can nudge the scope W and the star will move E. So this disposes of E and W. What about North and South? This depends on how many mirrors are in your optical train.
If you have an odd number of reflections (1, 3, etc), the field in your eyepiece will look like the left hand diagram below, while if you have an even number of reflections (0, 2, 4, etc) the field in your eyepiece will look like the right hand diagram. In both cases, use the memory aid “We Never Eat Scraps”. You can change “scraps” to something else if you prefer. With an odd number of reflections, you start at W and move around anticlockwise round the eyepiece. With an even number of reflections, you start at west and go clockwise around your eyepiece. As a double check, you could nudge the scope N and the star will move S. Now that you know where N, S, E and W are in your eyepiece, you can move onto the next step.
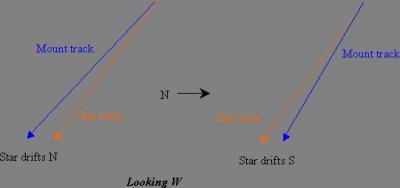
Step 2: Line up your reticle eyepieceSelect a star, any star, and rotate your reticule eyepiece into such a position, that when you use the slow motions or hand paddle of your mount, the star follows the cross hairs. In other words, line up the cross hairs of the eyepiece to point N, S, E and W. Step 3: Adjust the altitude of the mountSelect a star in the West near the celestial equator (that is, with declination near zero) and no more than 30 degrees above the horizon. Centre the star and watch to see if it drifts N or S. If the star drifts N, lower your altitude, if it drifts S, raise the altitude. Alternatively, you could look E to adjust altitude if this is more convenient. In this case, if the star drifts S, lower your altitude, if it drifts N, raise the altitude.
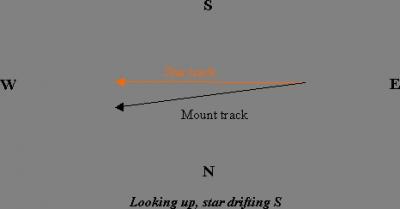
The picture should make it clear that to make the tracks of the mount and star coincide, you have to lower the altitude of the mount in the left-hand case and raise it in the right-hand case. If you raise your arms to the sky in imitation of these tracks, it should be easy to see what you have to do to adjust the mount. As an aside, when we talk about the star drifting N, what really happens is that your scope drifts S. Step 4: Adjust the azimuth of the mountNow pick a star on the meridian near the equator. If the star drifts N, turn the mount clockwise as viewed from above. If it drifts S, turn the mount anticlockwise as viewed from above. Here again, it is best to work things out from scratch each time. Have a look at the diagram below. It shows a star drifting S (actually the scope is drifting N). If you were lying under the mount, you have to turn the mount clockwise as viewed from your position to make the tracks coincide. However, since you are probably looking down at the mount, you have to turn it anticlockwise. Again, holding your hands in the air to simulate the tracks of the mount and the star should make it easy to see which way to turn the mount.
Step 5: Repeat steps 3 and 4Repeat steps 3 and 4 until you get no drift when you swap from one to the other. How exact you have to be here depends on what you are going to do. For imaging, you should get no drift for at least 10 minutes. For visual work, a couple of minutes with no drift is probably good enough. If your mount is not level, you will have to repeat steps 2 and 3 more times, so it helps to have the mount nearly level at the start. Step 6: Relax!You should now be within a mosquito’s whisker of the pole. Article by Geoff Smith (ghsmith45). Discuss this article on the IceInSpace Forum.  |
|