ICEINSPACE

|
16" Lightbridge Modifications
Submitted: Tuesday, 6th November 2007 by Peter Batchelor
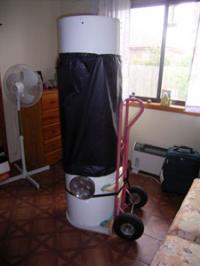
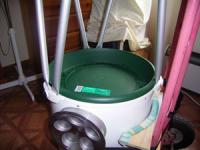
After a number of years of casual use of the 10 inch Dobsonian telescope that I built back in 2001, I dropped in at the Camberwell showroom of the Binocular and Telescope Shop to have a look at Meade's Lightbridge range of telescopes. I had read Richard Brown's review of the 16 inch model on the IceInSpace site and I wanted to see if it was as good as it sounded. There didn't seem to be all that much information / reviews online about it, apart from IceInSpace, and another review by Chris Thomase on the Cloudy Nights site. What I did read seemed all good, and within a few weeks I was the proud owner of a 16 inch telescope - with far more light-gathering power than I could possibly have imagined owning back when I was borrowing a Celestron C8 back during my days at Teachers College. What do I think of it? I think that it is a fantastic telescope! The movement is quite light, and the views are spectacular. I've only had a limited chance to view Jupiter and the moon (both showed much more detail than the 10 inch), and some of the Messier objects. Some of these that showed up as hazy balls of light in the 10 inch can be seen as groups of individual stars in the 16 inch telescope. There are things that could be improved, and I've already made some modifications, but I'm going to take some time and get really familiar with the telescope before I start making major alterations... Meade's Lightbridge telescopes are a Dobsonian truss design - something I was familiar and comfortable with from my 10 inch telescope. The base is made of chipboard. The azimuth plate is circular, and so wide that I have to juggle it very carefully through standard doorways. Some people have apparently cut theirs down to a square or rectangular shape, so that it can sit on a trolley and be rolled through a doorway. I'm still considering this, though I am currently tending towards the idea of building a new base out of marine plywood (my boatbuilding skills will come in handy here). If I built a new base, I could experiment, and perhaps fail, and always fall back to the original mount if necessary. I would also replace the atitude bearings on the tube with discs with a much larger diameter, following the ideas from Kriege and Berry which I used in my 10 inch. The altitude bearings in my 10 inch are twice the diameter of the Lightbridge, and also rest on teflon pads rather than felt. This would perhaps make the altitude motion a little more smooth and accurate - perhaps not - I'll have to wait and see. Collimating the mirrors was a simple task, using a Kendrick laser collimator. I've read that many people have replaced the adjustment screws on the secondary mirror with a set of knobs, so that it isn't necessary to use a screwdriver, and I can see that this would be a benefit, but using a screwdriver certainly isn't a problem. The primary mirror has adjustment knobs and locking knobs, so making adjustements to the primary is very easy. When the tube is not resting in the mount, the base has three small feet, to prevent the tube resting on the adjustment knobs. The mirror mount contains a fan. A battery pack that plugs into it and helps cool the mirror down. I don't know how much faster this is - one day I'll get around to testing it with and without the fan. The primary mirror is covered by a thin plastic lid that looks like a rubbish bin lid. It jams down around the mirror, and I don't like it. I suspect that it is a scratch waiting to happen. I'll use it while transporting the telescope, but most of the time it will remain off. I've found a base of a planter pot (bought from Bunnings, made by http://www.zarif.com.au/) that is the same diameter as the tube, and with a small section taken out of the edge to allow it to fit against the trusses, this snaps into place and guards the mirror against accidents. As it is too large to fit inside the tube, I can't accidently drop the cover on the mirror. I can also store my eyepieces in a box on top of this while moving the telescope. I've sewn a ripstop shroud (I've still got some ripstop left over from my time as a kite maker) to reduce stray light and to help stop the mirror dewing up.
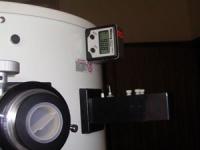
The red dot sight that came with the telescope didn't focus properly, and didn't seem to have any focussing adjustment, so this has been relegated to the 10 inch scope, and I've put my Rigel Systems Quickfinder on the Lightbridge. I use both Planetarium and Astromist on my Palm Tungsten C to locate objects. Astromist has a great collection of photos of Messier and objects,and a relatively detailed map of the moon, but I find that it takes a while to start up on my Palm. Interestingly, there is a significant difference in the coordinates given for the same object by the two applications, so I tend to use Planetarium while at the scope, and Astromist while working out what I might like to look at. If I ever decide to make some digital setting circles for this telescope (using the informaton on Dave Ek's website) I will be able to use Astomist as the controller for them. I originally placed an altitude scale on the mount, with an adjustable pointer fixed to the bearing, but because of the size of the bearing I wasn't particularly happy with the level of accuracy I was getting. I was using an Empire Bullseye circular level mounted in the base, and placing shims under each leg to get the base as level as possible, but the scale was too small to get very close to objects, except by luck. Now I use a Wixey digital angle guage for determining altitude. This is accurate to one tenth of a degree, and has the added benefit of not needing to have the base leveled first.
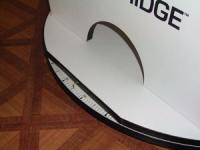
I use an azimuth setting circle made by routing a disc from a sheet of polycarbonate, based on the one shown at the StarTrak website (a much more elegant solution than the one I used on the 10 inch telescope), but with the middle section routed out to allow it to sit alongside the roller bearing plates. Small segments have been also been routed out for the three teflon pads sitting on the lower section of the base. These weren't all at exactly the same distance out from the middle, each segment was measured and then routed separately. The segments that have been cut out allows me to move the setting circle through about 25 degrees, so as long as I have the base roughly aligned towards North, and the setting circle is showing North, I can move a bit over 12 degrees either way when I do a quick alignment by pointing at a known star or planet I marked the azimuth circle by downloading StarTrak's Setting Circles program, printing out the protractor, and then using it to mark the degree divisions on the edge of the polycarbonate sheet with a CD marking pen. Given the size of the base, this equates to about 7mm per degree. I wanted the polycarbonate to be completely protected and supported by the lower section of the base, so this meant removing section from one the side of the upper part of the base in order to view the setting circle. A cup hook screwed into the upper section of the base is used as an indicator. Both Palm applications I use have a night mode, and I find that the red light of the screen is sufficient to read the coordinates showing on the setting circle and the angle guage when pointing the telescope at an object.
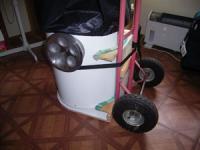
This telescope is quite heavy, so while carrying it around is possible, I wanted to make it as easy as possible. I carry the base outside separately, and wheel out the tube on a trolley, to which I've aded a larger base and supports to match the profile of the tube. Air-filled wheels on the trolley prevent everything from vibrating, and now moving it around is a breeze. A piece of nylon webbing holds the assembled tube securely against the supports. I can now comfortably move the assembled tube around, which means that I am much more likely to use it more often.
The next task is to work out which eyepieces this telescope performs best with. At F4.5, this mirror has a certain amount of coma, and the reviews I've read of this telescope have been universally negative about the 2" Meade Series 4000 QX 26mm eyepiecethat comes with it. I've found that if the mirror has cooled down sufficiently then the view through this eyepiece is OK, though the view through the 2" Bintel FMC 40mm Kellner seems sharper. Both lenses suffer towards the edge of the field, as a result of the mirror's coma. The 1.25" 25mm Plossl that I bought from Bintel when building the 10" telescope gives sharp images, but doesn't seem to have the same amount of eye relief - it is harder to keep your eye positioned to give a good view. I'm looking forward to taking this telescope to a few star parties and comparing it with others, and also seeing what eyepieces I should be considering...
Article by Peter Batchelor (peterbat). Discuss this article on the IceInSpace Forum.  |
|