ICEINSPACE
Member Login
Most Read Articles
Moon Phase
CURRENT MOON Waxing Crescent
6.8%
The Sun Now


Stellarium Telescope Control with a HEQ5/EQ6
Submitted: Friday, 12th March 2010 by Karl van Louwersen

Objective

To get a visual indication of where the telescope is pointing by looking at  “cross Hairs” on a planetarium, preferably with a circular “field of view”, to watch the movement of the telescope relative to the background stars to see where it is going, to be able to “roughly” automatically track a given object and then correct the small errors automatically to get “perfect” guidance.

And then, to get this all for free!

If you have a HEQ5 or EQ6 mount, a Shoestring (or similar) adaptor, a RS232 to USB cable and it is plugged in to your computer and you know your latitude, longitude, elevation and hemisphere, then, read on.

How to install and set-up Stellarium, EQMOD (ACSOM) and StellariumScope.

Installation and set-up Stellarium, EQMOD, (ACSOM ) and Stellarium Scope

The absolute must before installing Stellarium is to have the very latest video card drivers installed on your computer and even then there may be some issues.

Note: Stellarium comes with some built-in Telescope control software

  • Celestron NextStar or compatible telescope
  • Losmandy G11
  • Meade AutoStar
  • Meade ETX 70
  • Meade LX200
  • Sky Watcher
  • Wildcard Innovations Argo Navis

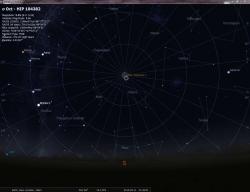
However, if you want to use the EQMOD interface and Stellarium, which looks like the below:

image001.jpgimage002.jpg

Click to Enlarge
EQMOD Interface

Click to Enlarge
Stellarium Interface

Then as of 15th June 2010 you need:

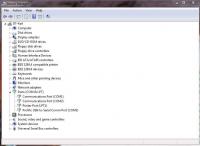
Assume that you have installed ASCOM Platform 5, the ASCOM 5.5 update, Stellarium 0.10.5, StellariumScope 20100614 and EQMOD v121d and updated your video drivers.

Assume that you have a HEQ5 mount, a Shoestring adaptor, a RS232 to USB cable (and driver software) and it is powered up and plugged in to your computer.

Step 1  Find your telescope (USB to Serial) com port on your computer.

Control Panel -> Device Manager -> Ports (COM&LPT) to see the various com ports, eg Prolific USB-to-Serial Comm Port (COM3)
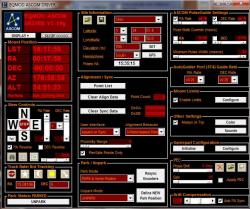
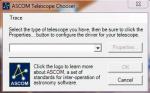
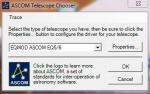
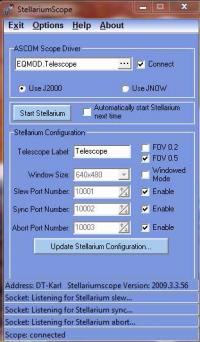
image003.jpg

Click to Enlarge
Step 1: Device Manager

Step 2: Start StellariumScope

2.1: Click on the browse button with 3 dots on it, and the ASCOM Telescope Chooser window is displayed.

2.2: Select "EQMOD ASCOM EQ5/6" from the dropdown box.

2.3: Click on "Properties" button.

image004.jpgimage005.jpgimage006.jpg

Click to Enlarge
2.1: StellariumScope

Click to Enlarge
2.2: ASCOM Telescope Chooser

Click to Enlarge
2.3: Click on "Properties"

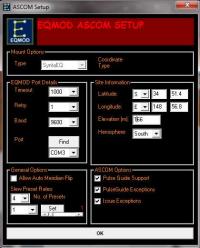
The ASCOM Setup window is displayed.

Enter your data for Latitude, Longitude, Elevation, Hemisphere and select your com port, e.g. COM3, and click OK.

image007.jpg

Click to Enlarge
ASCOM Setup Window

Note:

  • StellariumScope latitude and longitude format is degrees and then minutes to one decimal place.
  • Stellarium latitude and longitude format is degrees, minutes and seconds to two decimal places.

So, if your Latitude is 34 degrees 51 minutes 26.70 seconds then this becomes 34 degrees, (23 +26.70/60) = (23+0.4)=23.4 minutes or 34 degrees 23.4 minutes.

You should probably use this less accurate value converted back to 34 degrees 23 minutes 24 (0.4*60) seconds in Stellarium!

This is something which needs to be raised with EQUMOD/ASCOM.

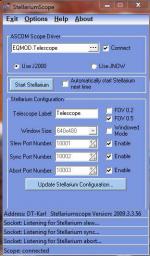
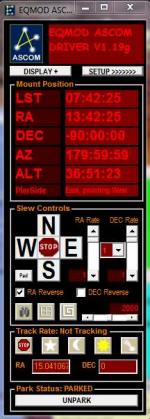
Back to StellariumScope.

2.4: Check the little white box "Connect".

2.5: The EQMOD ASCOM DRIVER screen should appear.

2.6: Click on the "SETUP" button to display the full window.
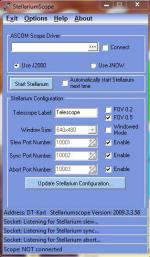
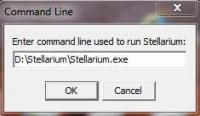
image008.jpgimage009.jpgimage001.jpg

Click to Enlarge
2.4: Check the white "Connect" box

Click to Enlarge
2.5: EQMOD ASCOM DRIVER screen

Click to Enlarge
2.6: Full window

Step 3: Back to StellariumScope panel

3.1: Click on “Options” drop down menu, then select “Modify Stellarium Command line”

3.2: The command line window is displayed, enter the directory containing "Stellarium" and click OK.

3.3: Press "Update Stellarium Configuration" button

3.4: Press "Start Stellarium" button and Stellarium should start.

image008.jpgimage010.jpg

Click to Enlarge
StellariumScope panel

Click to Enlarge
Stellarium Command Line

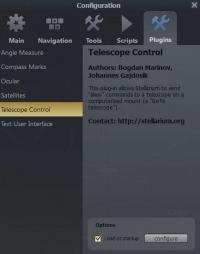
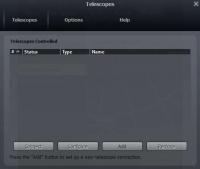
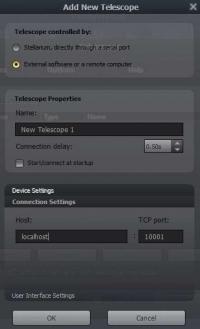
Step 4  On Stellarium, select the “Location” window

Add same location as done earlier in step 2.

4.1: Select “Configuration” window and click on "Plugins"

4.2: Select "Telescope Control" and check "Load at Startup" checkbox, and click "Configure"

4.3: Press "Add" button

4.4: Select "External Software or a remote computer"

image011.jpgimage012.jpg

Click to Enlarge
4.1: Select "Plugins"

Click to Enlarge
4.2: Plugins window
image013.jpgimage014.jpg

Click to Enlarge
4.3: Add window

Click to Enlarge
4.4: Add new telescope windpw

Note:

  • The TCP port should start at 10001 and index upwards as “more” telescopes are added.
  • Press “OK” and repeat this step two more times until three “telescopes” are added, remembering to select “External software or a remote computer” each time!
  • Three local connections are required,
    • the first  for Slew....
    • the second for sync....
    • the third to abort.....
  • They can be named individually.

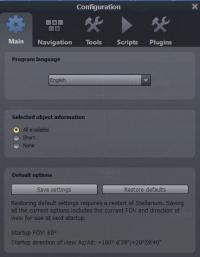
Go back to Main tab on Configuration window, click on “Save Settings” button.
Shut down Stellarium
Shutdown StellariumScope.

Step 5  Start StellariumScope.

  • Check the “Connect” box on StellariumScope.
  • The EQMOD ASCOM DRIVER panel should be displayed.
  • Click on the “Start Stellarium” button on StellariumScope.
  • Stellarium should start.
  • Click on Configuration, Plugins, Telescope Control and then “Configure” button.
  • Highlight #1 status
  • Click on “Connect” button.
  • After a couple of seconds, the status should change to “Connected”.
  • Repeat this for the other two “Telescopes”
  • Everything should now be ready to rock and roll! 

Watch for Part 2 of this epistle on how to configure and control the telescope!

If you have got this far, then some suggested reading - page 18 on:
http://www.welshdragoncomputing.ca/eqmod/EQMOD_Doc_2009.pdf

Clear skies, happy playing with your toys!

Article by Karl van Louwersen (kvl). Discuss this article on the IceInSpace Forum.

Advertisement
Bintel
Advertisement
Testar
Advertisement
ICEINSPACE
AUSTRALIAN AMATEUR ASTRONOMY
Copyright © 2004-2024 ICEINSPACE.
All rights reserved.