ICEINSPACE

|
Repairing a Finderscope Crosshair Reticle
Submitted: Thursday, 26th July 2012 by RG
Crosshair repair may be a very economic option if you break one. Assuming you have a few common household items lying around, the cost is around $5. I found the crosshair repair procedure to be quite straightforward – fiddly, but straightforward. PreparationTypically, the crosshair reticle consists of a small, threaded plastic or metal reticle ring that screws into the inside end of your finderscope eyepiece. Remove or unscrew your eyepiece and have a look. There are probably a couple of small circular indentations in the top of the ring opposite each other – if you don't have the right tool, you can use a small jewellers screwdriver (or, say, a metal skewer or small nail) to unscrew it – be gentle and patient when unscrewing
You should also see small grooves or notches used to position the crosshair wire across the ring. A source of replacement wire may be closer at hand than you think. I first tried with some wire extracted from disused “button” earphones, about the same thickness as the original wire, but it proved too fragile to tension over the crosshair ring. I next tried some very thin twin flex (used in low voltage DC systems – I bought it from JayCar some time ago – it's quite cheap). That worked well. As it's only a finderscope, it needn't be the finest crosshair. Extracting the wire is painstaking. You need to carefully peel off the insulation and extract around 15-20cm of wire, then untwist to retrieve two single strands. You will probably break a few strands in the process, but I didn't need to repeat the exercise to get two 15cm lengths.
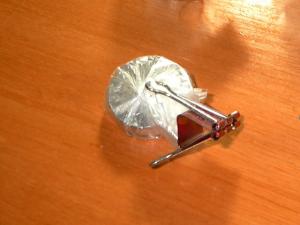
Next you will need tensioning weights. I made some myself, each with a smallish bulldog clip, a bit of plastic wrap, a wire rubbish bag tie and sticky tape. I used 4 x 50c pieces for each weight – you may need to adjust this if your wire is thinner and more fragile than mine.
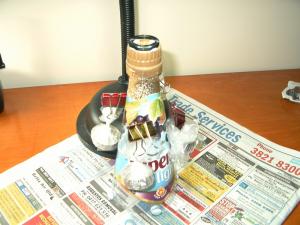
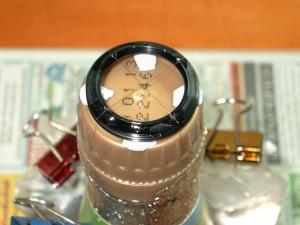
You will need a suitable stand to work on. I cut the top half off a plastic cordial bottle as it was then short enough to fit under the magnifying lamp on my desk and tall enough so that the tensioning weights would hold the new wires taught. It was also at a comfortable working height. An aerosol can with flat plastic lid may also do. Repair ProcedureFirst, you'll need to remove the remnants of the old cross-hair wire with a sharp utility knife and/or tweezers. Temporarily fix the crosshair ring to the stand with Blu-Tack or similar. Attach the weights to the two ends of each wire with the bulldog clips and then carefully lift each wire using a finger from each hand, supporting the wire from underneath, somewhere near the middle. Position the wire over the corresponding groove/notch. Reposition as necessary to centre and ensure straight, untwisted wire strands.
Using a fast-setting two-part epoxy glue (e.g. 5 minute araldite), put a drop of glue over each of the four points where the wire crosses a groove, but make sure the drop is small enough that it doesn't spill into the threads on the side of the ring. I used a toothpick dipped into the mixed glue, which worked well. The glue ran laterally more than I expected but did not run into the threads.
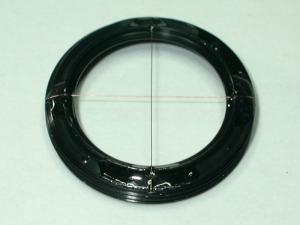
Leave the glue to cure at least overnight before removing the weights and taking the ring off the stand. I suggest waiting a further three days before trimming. Trim excess wire at the outer edge of the crosshair ring with a sharp utility knife – the new crosshair is complete.
You can now re-insert the crosshair ring into your finderscope eyepiece, using the reverse if the procedure you used to remove it, and put the eyepiece back in the finderscope. The finished result is quite pleasing.
 |
|